Menus

MENUS

Top MenuBar items (Food, Culture, History, Themes, People, Search, Language Switching) are linked to other pages (shown below). These items are added in WordPress in the normal way via WordPress Dashboard > Appearance > Menus. On small screens the MenuBar is replaced by a hamburger ☰.    See code for hamburger
The Culture page has links to Anecdotes, Arts, Patuá, Cook Books and to other pages, also related to Culture, that have been assigned the tag .” culture.
The Food page has links to the associated public Macanese Recipes website.
The History page has links to historical eBooks, articles, biographies, etc., and to other pages, also related to history, that have been assigned the history.

Themes

Here pages are grouped according to their subject matter through their tags. Pages with the same tag generate an index called a Tag Archive. There is also an index with subjects in alphabetical order.     More about tags

People

The People page has links to other pages of prominent people: Nobles, Honours and an Index.

The Nobles page lists ancestors of Macanese who were nobles. The Honours page lists Macanese (and their spouses and ancestors) who received national honours from a government. Read more.

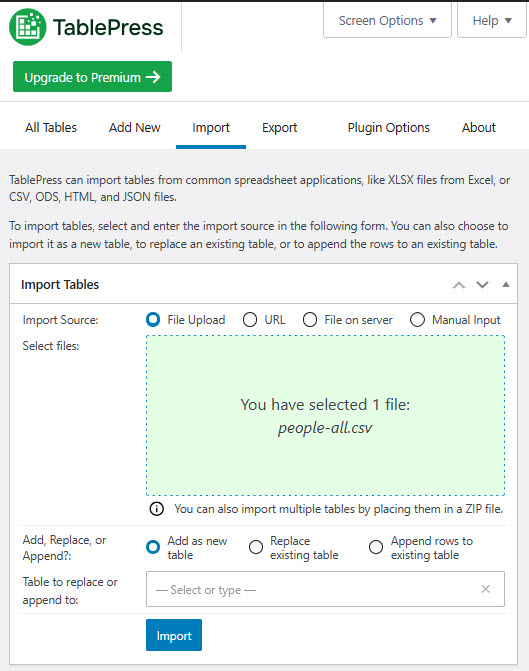
The names of authors and of Macanese people mentioned in documents have been compiled in a spreadsheet (in C:/UDF2/people_all.xlsx), with links to other pages or sites where possible, and then imported into the website using the TablePress plugin as follows:

  • Click WordPress Dashboard > TablePress > Import
  • Select the file TablePressImport.jpg
  • Click Import

In this case, the table was imported into WordPress Dashboard > TablePress > All Tables > ID 88 where it can be edited.    See code for A-Z for Tablepress

Clicking on Search opens a search form.

Language Switching

Clicking takes the user to the Home page of the alternate language.    Read more
Items in the Footer (links to pages, Visitor Feedback, Privacy, Acknowledgements, Copyright line) are added using coding. See code. The items provide a link to separate pages with more detail.

Contact

The Contact page includes a form which is created using Elementor Pro‘s Form widget. The form has a reCAPTCHA in Elementor>Editor>Settings>Integrations. How to Connect reCAPTCHA to Elementor

Connecting reCAPTCHA to Elementor

Step 1 Connect reCAPTCHA to Elementor

In the WordPress dashboard go to Elementor > Settings > Integrations

Scroll down until you see reCAPTCHA.

You will see two boxes:

reCAPTCHA Site Key
reCAPTCHA Secret Key
 

Paste the keys you obtained from: https://www.google.com/recaptcha/admin

Then click Save Changes.

Step 2 Return to your form

Now edit the page again with Elementor.

Click the Form widget.

In the left panel go to Form Fields > Add Item > Type > reCAPTCHA V3

Now you will see a new field type available: Badge > Inline

Click Add Item.

1