DESIGN AND LAYOUT
Dashboard
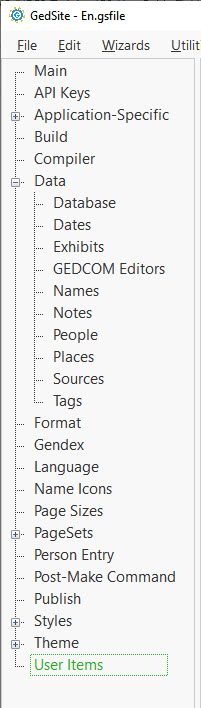
The properties of a website are set in the Gedsite dashboard.
You should not normally have to be concerned with the details of the website. Here we mention mention only three components that might need to be changed occasionally: the Data>Database, Data>People and Language.
Database
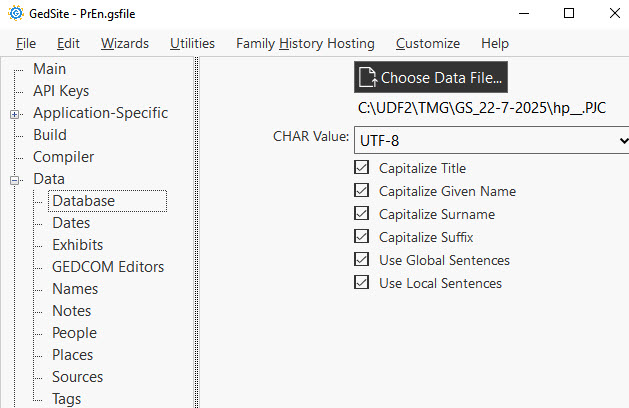
- Click on Data>Database>Choose Data File
- Navigate to the current database file (e.g., C:/UDF2/TMG/GS_22-7-2025/hp__.PJC)
- Click on File>Make site or hit CTRL-m
People
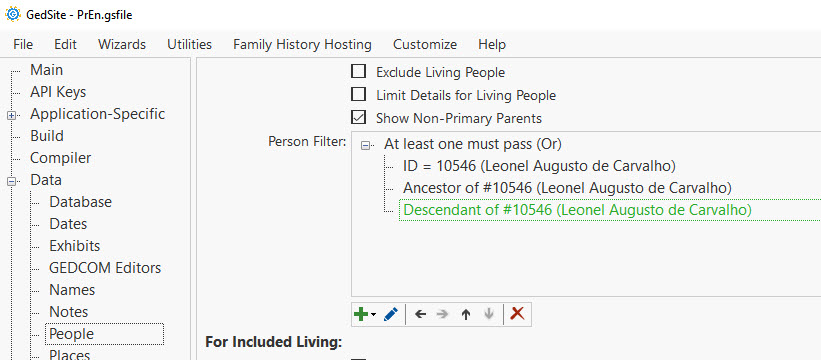
During development, it is convenient to test using a small fraction of all the people in the database. This is done by using the Data>People>Person Filter and clicking on the green + icon to add a selection of people.
After development, delete everything in the Person Filter.
Language
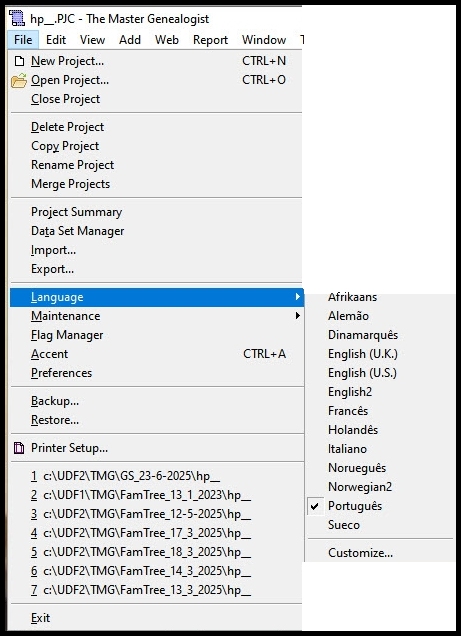
Each site file (PrEn.gsfile and PrPt.gsfile) has its language set once in Dashboard>Language and is not changed.
As far as possible, all pages contain both English and Portuguese text but only the language selected from the MenuBar is displayed.
Other components
Other components (Menus,Exhibits, Styles, etc.) in setting up the websites should not normally need to be considered, but are recorded in Set up.
Styles
Styles are set in Dashboard>Styles. Read more
Links
Links from Menus
The links used in menus are complicated because GedSite creates a structure for the published website that is different from that used when building the site on your computer. From the input folder (for example En-i) GedSite generates an output folder (for example En-o), but it rearranges the files in the process, placing index and navigation pages in the up folder and shared files such as images and CSS in the ui folder. As a consequence, the paths used to reach pages and files in the finished website differ from those used in the local build on your computer. This means that a single simple link cannot reliably work in both environments, so a compromise is needed. Menu links — such as the logo link to the home page and the language-switch links — must always work on the published site, so these are written using the full web address. The penalty is that when testing the site locally these links will not operate within the local copy when clicked, because they point directly to the live website.
However, they can still be tested by running the local site through a local browser server like Visual Studio Code.
Links to Person Pages
From TMG
How this is actually coded
Read about earlier codes we had to use
From Gedsite
For links from a page in Gedsite to a Person Page, we can use this shortcode:
Links of this form also works from external files included in Gedsite (e.g., NationalHonours.htm, Nicknames.htm) as they become part of Gedsite.
Mapping faces
Here we show how to use GIMP to map faces in a photo, and to add the resultant coding to the properties of the photo, so that clicking on a face will take you to that person's page.
- Open GIMP
- Navigate to find and select the photo
- Click on Filters > Web > Image Map
- Select the Polygon tool
- Click around the face to envelop it, then double-click to close.
- In the dialog that appears, enter the ID of that person:
- URL: p#ID
- Click OK
- Back to GIMP>File>Save As>MAPCODE.map, somewhere convenient like C:\UDF2\Photos. It generates something that includes
- In Notepad++ open the file MAPCODE
- Copy the code <map name ... </map>
- Open TMG and navigate to the person to which the photo is allocated
- Click on the Exhibits Icon in the top toolbar and select the photo Properties>Description
- In the Description field paste the code.
- Click OK
Expandable “Read more” Content
When there is a large block of text on a Person Page, it is convenient to enter some brief introductory text and a Read more button which, when pressed, displays the full text.
This is accomplished with Javascript and CSS. The JS is in Gedsite>PageSets>Person Page and also in Gedsite>PageSets>Default and the CSS is in Gedsite>Styles>User Styles>.
Tooltips
Tooltips are small pop-ups that appear when you click some chosen trigger (a word or words or image, also called the keyword), to bring up a small screen with text and images (tooltip content) that provides extra information without leaving the page. The trigger has a dotted underline like this one.
Tooltips Plugin
wpTooltips Pro is a very powerful and flexible plugin but has serious limitations that can lead to catastrophic website failure. It is convenient but should be used sparingly, especially for auto-insert.
- Carriage returns should be inserted in tooltip content only using HTML markup such as <br> or <p>...</p> or <div> ... </div>, never by pressing Enter. Read explanation
- The keyword must be unique; serious problems can arise if keywords are duplicated or are similar (like Júlia Belarmina Soares and Julia Belarmina Soares).
- Make sure that your keyword can never appear as part of some other word (for example, keyword Ann will trigger a tooltip in the word Annex or Johann).
- Do not use very common words like Macanese because there would be tooltips sprinkled everywhere.
- Do not add a link to a keyword; invalid nesting like <a href="...">John Smith</a> can cause serious problems to the website.
- Avoid using two names where one contains the other, even if the difference is only extra words; examples to avoid:
Keyword A: Maria Soares, Keyword B: Maria (Mimi) SoaresKeyword A: Maria Soares, Content A: Maria (Mimi) Soares Explanation
- In particular, check any HTML in the keyword and in the tooltip content very carefully because coding errors like
an unclosed tag: <div> ... (missing closing </div>)an unclosed quote: <img src="...>; (missing closing ")can cause a serious problem.
Another fault concerns synonyms; wpTooltips allows for synonyms of the keyword to be used as well. While this appears very convenient, synonyms are not exported.
Summary
- For auto-insert, make sure the keyword is unique.
- If you must include HTML in the tooltip content, check very carefully for errors.
- Never duplicate keywords.
- Never have a keyword contained inside another keyword or inside any tooltip content.
- Never insert carriage returns into tooltip content by pressing Enter; always use code like <br> instead.
- Do not use the synonym facility.
Lorem ipsum dolor sit amet, consectetur adipiscing elit. Ut elit tellus, luctus nec ullamcorper mattis, pulvinar dapibus leo.